
Your head weighs about 10 pounds. Tilt it forward to answer a text, and you place up to 60 pounds of force on your cervical spine. The tension radiating down your shoulders is simply your body failing to hold that unnatural angle.
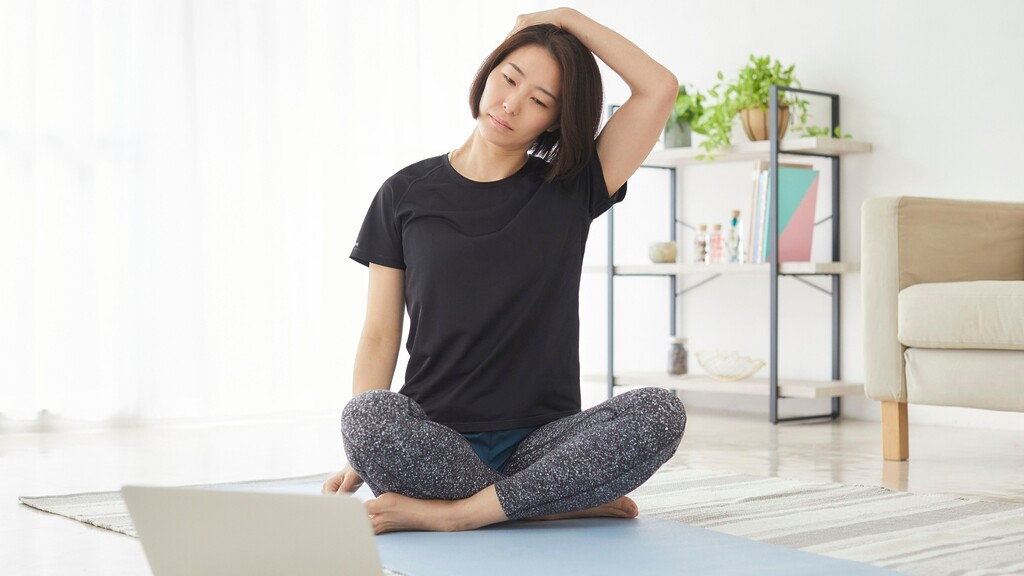
Telling yourself to sit up straight does not work. I tried that strategy for years when chronic back and neck pain made it difficult to even pick up my kids. I would tape notes to my monitor and set alarms on my phone. Nothing changed because the issue was structural.
When you spend hours staring at a screen, the muscles in your chest shorten and tighten. At the same time, the muscles in your upper back stretch out and become weak. Your body adapts to the shape it holds most often. If you want to know how to fix tech neck, you have to do more than just put your phone away. You have to actively reverse the tension.
The movements below are the exact tech neck exercises I used to rebuild my own posture and eliminate daily headaches. Always consult your physician before starting any new exercise program, especially if you have existing spinal issues or sharp pain.
The 7 Forward Head Posture Exercises
You do not need a gym or any specialized equipment for these movements. A blank patch of wall and a bath towel are enough to get started.
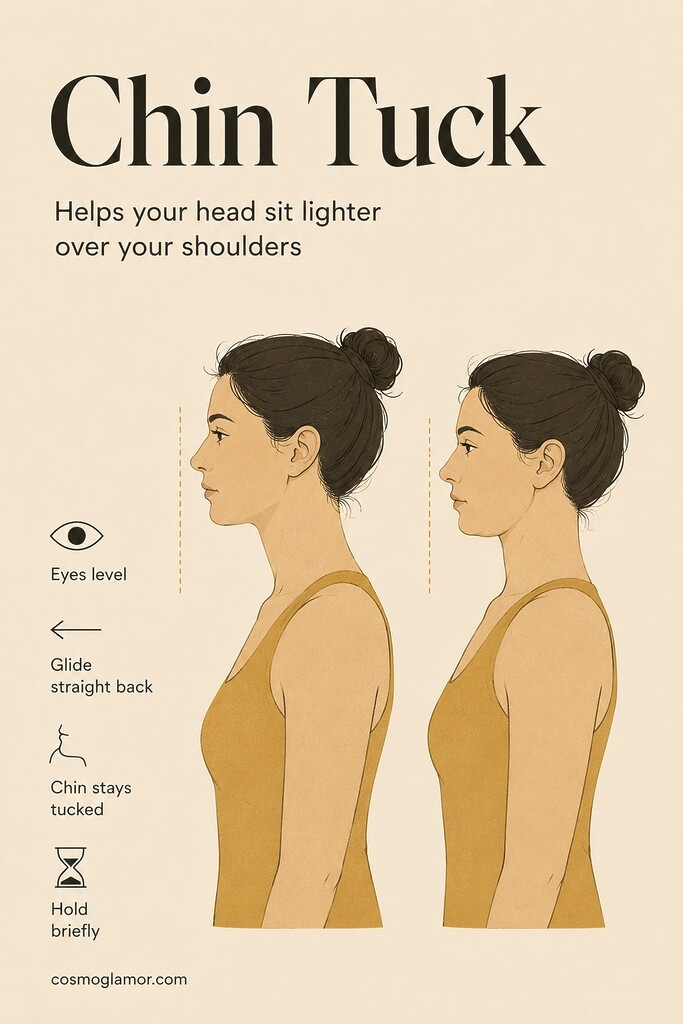
1. The Chin Tuck
This is one of the most useful movements for helping your head sit over your shoulders. You can do it sitting at your desk, waiting at a red light, or standing in line at the grocery store.
Sit or stand tall and look straight ahead. Place two fingers on your chin. Gently push your chin straight back as if you are trying to make a double chin. Keep your eyes level and avoid tilting your head up or down. Hold the position for five seconds, then release.
Pressing your head straight backward activates your deep cervical flexors, the tiny stabilizing muscles in the front of your neck that weaken when your head constantly hangs forward.
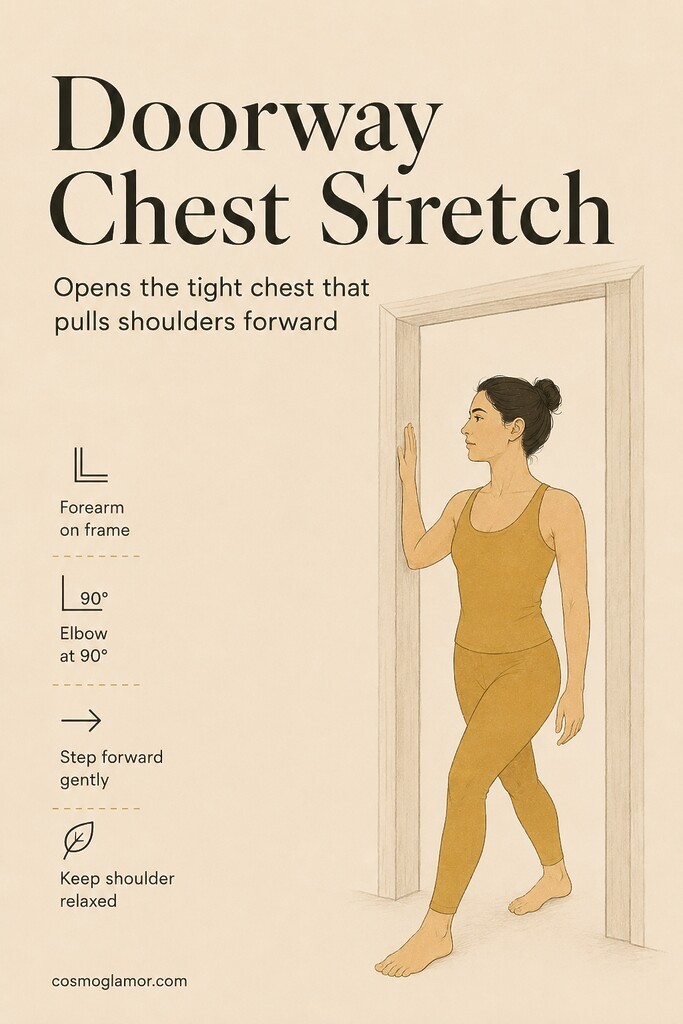
2. The Doorway Chest Stretch
You cannot fix your neck until you open up your chest. When your pectoral muscles are tight, they actively pull your shoulders forward and round your upper back.
Stand in an open doorway. Bend your right arm to a 90-degree angle and place your forearm flat against the door frame. Step your right foot forward gently until you feel a stretch across your chest and the front of your shoulder. Hold for 30 seconds, then switch sides.
Opening the pectoral muscles removes the constant forward tension that pulls your shoulders out of alignment, giving your back muscles a chance to hold your spine upright.
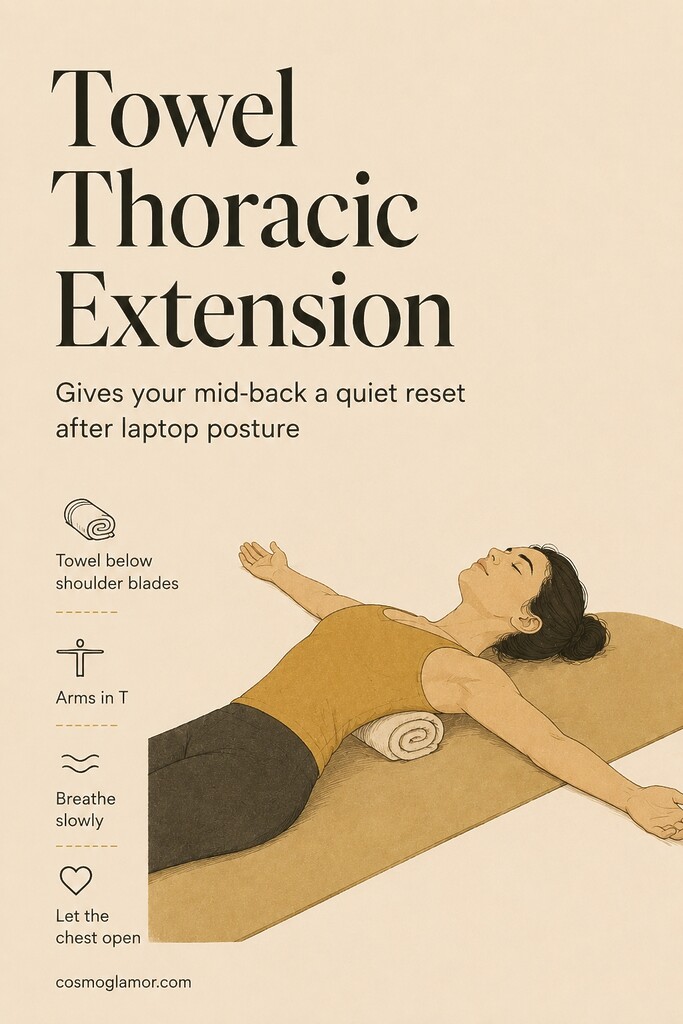
3. Thoracic Extension on a Towel
Your mid-back, or thoracic spine, takes a beating from laptop work. This passive stretch helps open the area while you simply lie on the floor.
Take a standard bath towel and roll it tightly into a cylinder. Place it horizontally on the floor. Lie on your back so the towel rests horizontally across your spine, right just below your shoulder blades. Rest your arms out to the sides like a letter T. Relax your breathing and stay here for two to three minutes.
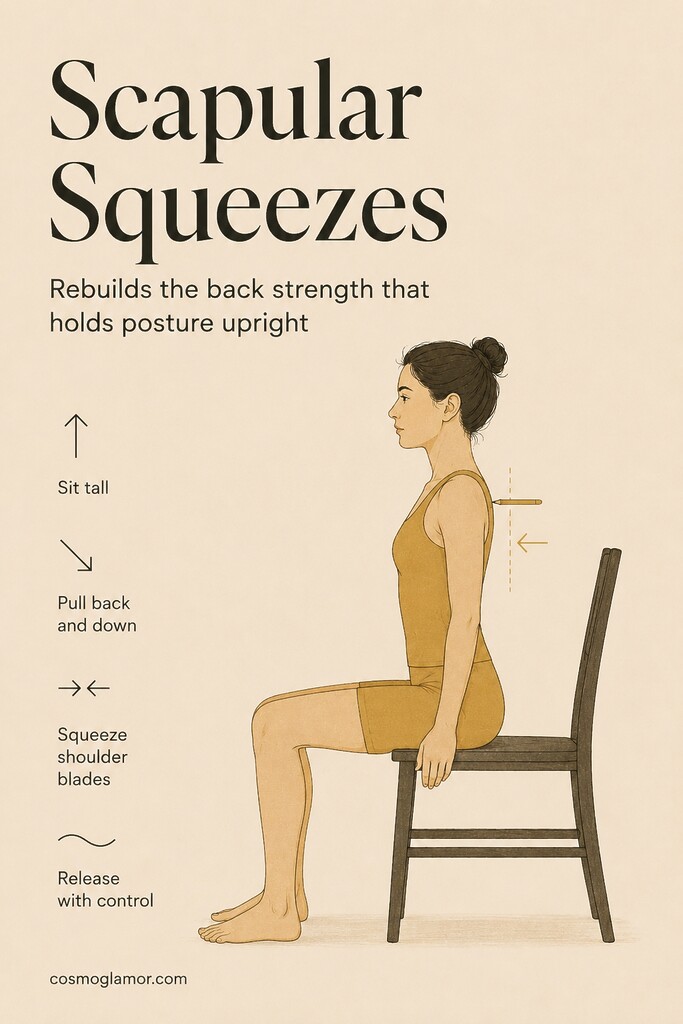
4. Scapular Squeezes
Once you have stretched the front of your body, you need to wake up the muscles in the back. I do a set of these every time I finish a long meal-planning session at my computer.
Sit on the edge of a chair with your feet flat on the floor. Let your arms hang loosely at your sides. Pull your shoulder blades back and down, pinching them together as if you are trying to hold a pencil between them. Squeeze hard for three seconds, then relax. Aim for 15 repetitions.
Activating the rhomboids between your shoulder blades builds the endurance required to keep your shoulders pulled back naturally throughout the day.
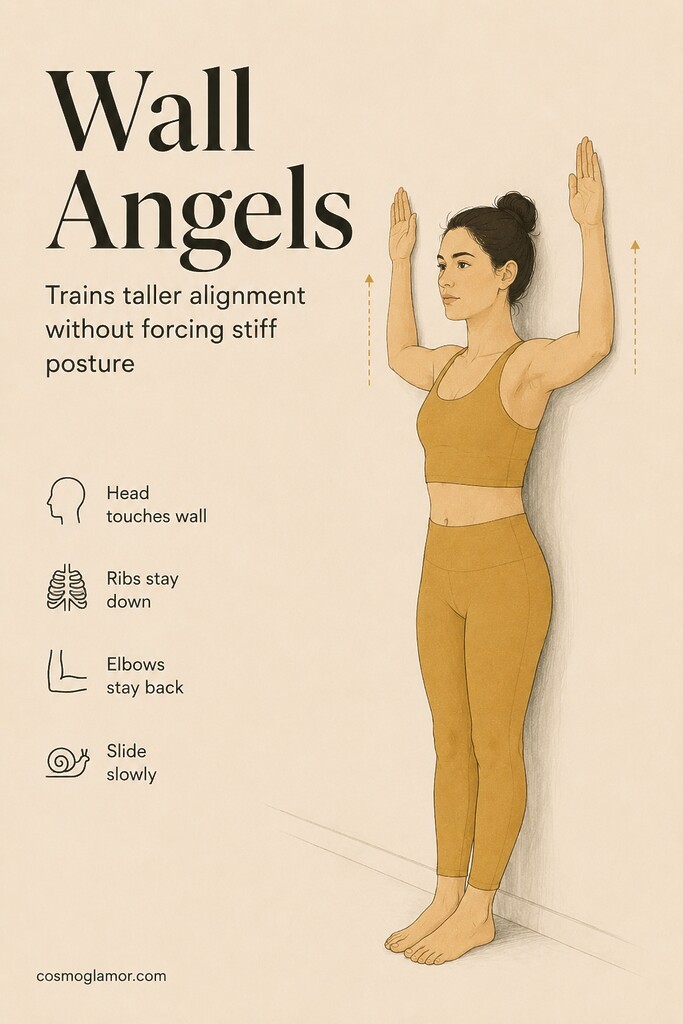
5. Wall Angels
This movement looks incredibly easy until you actually try it. It encourages your spine into a taller alignment while testing your shoulder mobility.
Stand with your back flat against a wall. Your heels, hips, upper back, and the back of your head should all touch the wall. Bring your arms up to a 90-degree angle, keeping your elbows and the backs of your hands against the plaster. Slowly slide your arms up the wall as high as you can without letting your back arch or your head pull forward. Slide back down to the starting position. Repeat 10 times.
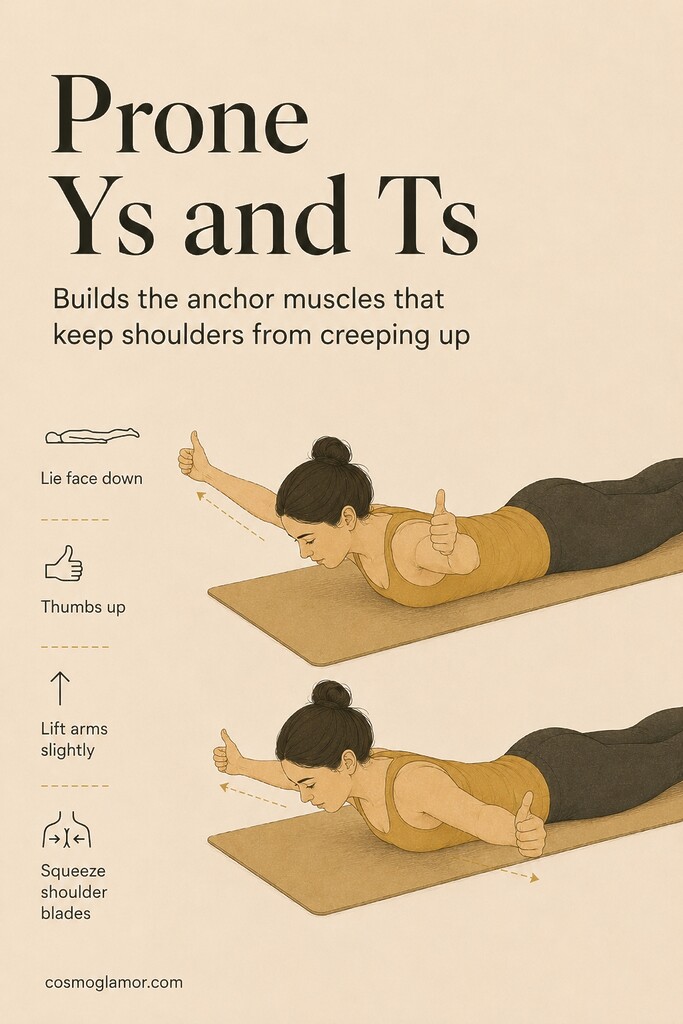
6. Prone Ys and Ts
Building strength in your lower trapezius muscles is vital for neck posture exercises. When these muscles are strong, they anchor your shoulder blades downward.
Lie face down on the floor or a yoga mat. Extend your arms out slightly above your head to form a letter Y with your body. Point your thumbs up toward the ceiling. Squeeze your shoulder blades together to lift your arms a few inches off the floor. Hold for two seconds, then lower. Do 10 reps. Next, move your arms straight out to the sides to form a letter T and repeat for another 10 reps.
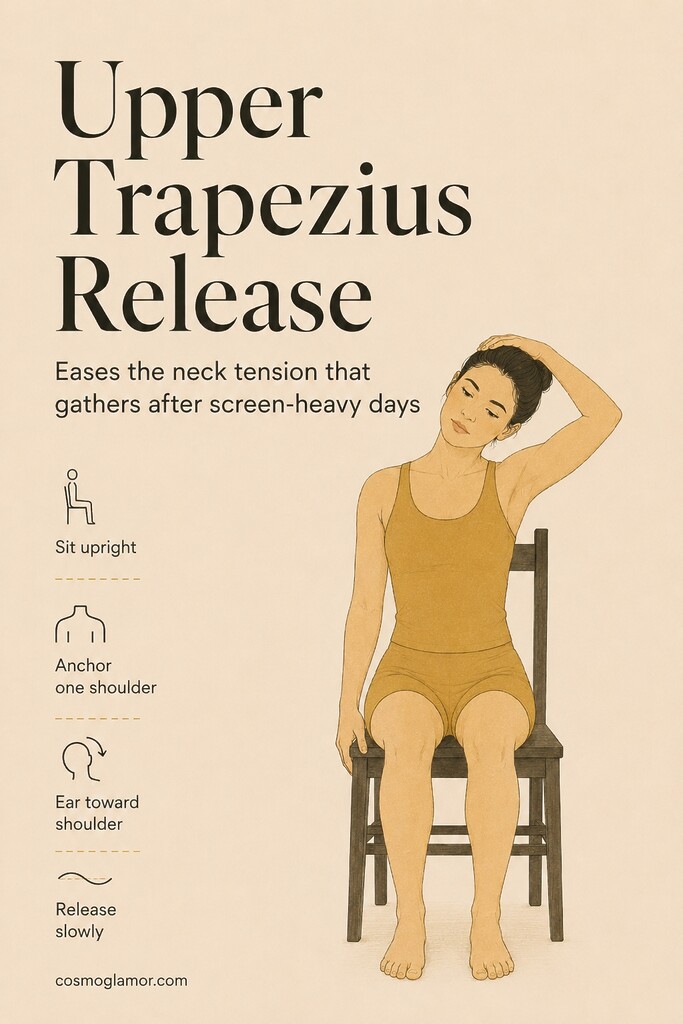
7. The Upper Trapezius Release
The large muscles running from your neck to your shoulders bear the brunt of tech neck pain. Stretching them properly signals the nervous system to finally let go of the tension.
Sit upright and place your right hand under your right thigh to anchor your shoulder. Gently place your left hand on the top of your head and pull your left ear down toward your left shoulder. You should feel a deep stretch down the right side of your neck. Hold for 30 seconds. Release slowly and switch sides.
Frequently Asked Questions
How long does it take to see improvements in my posture?
If you perform these movements consistently, you may notice a reduction in daily tension within a few weeks. Visible changes to your resting posture can take several weeks of regular practice. The key is frequency. Doing a few of these stretches daily is far more effective than doing a massive routine once a week.
Do I have to stop looking at my phone completely?
No, because that is not a realistic demand for anyone managing a modern life, a job, or a family. The goal is balance. When you know you have spent an hour hunched over a device, you simply need to spend a few minutes doing the exact opposite movements to reset your spinal alignment.
A Final Note on Consistency
Some days, you will catch your reflection in a window and realize your shoulders are creeping up toward your ears again. That is normal. I still catch myself slumping over my laptop when I am tired.
You do not need to aim for rigid, military-style posture. You just need to regularly remind your upper back what it feels like to carry the load properly. Start with just two of these exercises today. Pick the chin tuck and the doorway stretch, and notice how much lighter your head feels by dinnertime.
Sources
- Assessment of stresses in the cervical spine — Surgical Technology International, 2014.
- Therapeutic exercises for forward head posture — BMC Musculoskeletal Disorders, 2024.
- Deep cervical flexor training and posture — BioMed Research International, 2021.
- Manual treatment and rounded-shoulder posture — Journal of Bodywork and Movement Therapies, 2010.
- Scapular stabilization exercise and neck posture — Journal of Physical Therapy Science, 2016.