Catching sight of your profile in a mirror and noticing a pronounced curve at the base of your neck can be a jarring moment. That pronounced curve at the base of your neck, often called a dowager’s hump, can come from chronic forward-leaning posture, osteoporosis, or other changes in the spine. But the spine is remarkably adaptable, and you do not have to just accept it as a permanent feature.
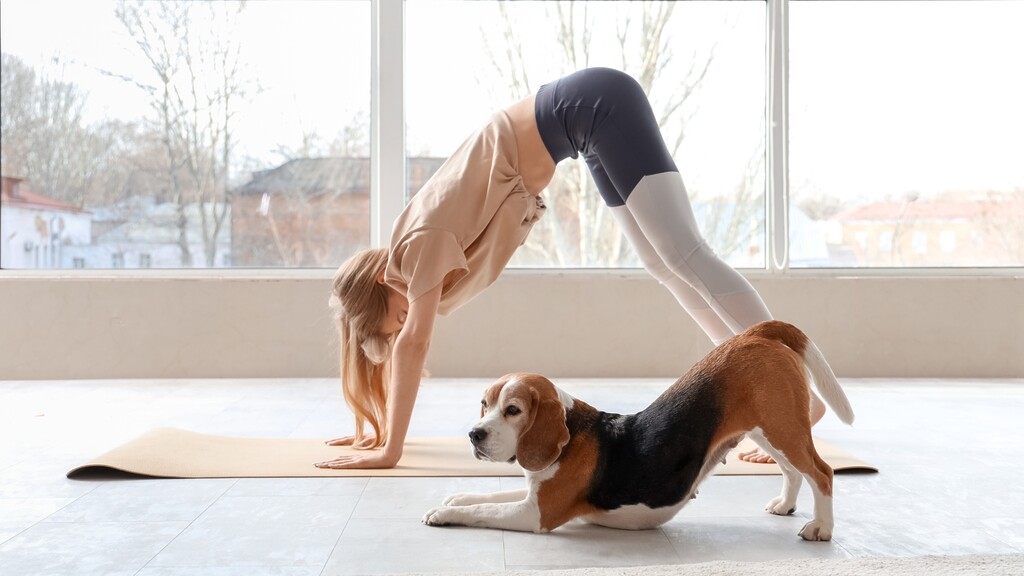
I spent years dealing with chronic back pain until I started treating my movement habits like a data project. I stopped looking for quick fixes and researched functional routines to build real stability. The movements that helped me regain an upright spine focus on reversing the daily slump by strengthening the upper back and lengthening the chest.
The Exercises for Realignment
This routine targets the root of the problem. A neck hump does not always develop in isolation. It can happen because the thoracic spine rounds forward, forcing the neck to crane upward so you can still look straight ahead. Fixing it means addressing the whole upper-body chain.
Because the neck is a sensitive area, pay close attention to how your body responds. Always consult your physician before starting any new exercise program, especially if you have a history of spinal issues. Skip these movements and seek medical advice if you experience any of the following:
- Sharp, shooting pain during a stretch
- Numbness or a tingling sensation traveling down your arms
- A previous diagnosis of severe osteoporosis or vertebral fractures
Movement should feel like work, and perhaps a deep stretch, but it should never feel like a pinched nerve.
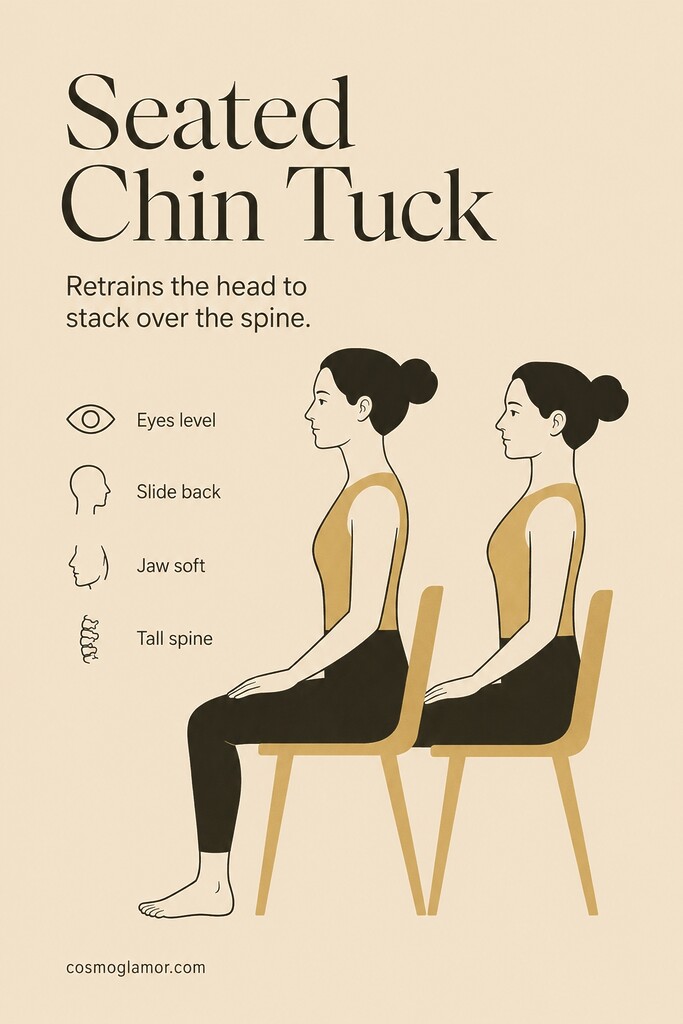
1. The Seated Chin Tuck
This is your baseline movement for restoring head positioning. Pulling your chin straight back helps train the deep cervical flexors, the small stabilizers that can lose endurance when the head keeps drifting forward.
- Sit up tall in a chair with your feet flat on the floor.
- Look straight ahead, and slowly pull your head straight back as if you are trying to make a double chin.
- Hold this position for five seconds, then release.
Target: 10 repetitions.
Form check: Keep your eyes level and your jaw relaxed. The most common mistake is tilting your chin up toward the ceiling instead of sliding it horizontally backward.
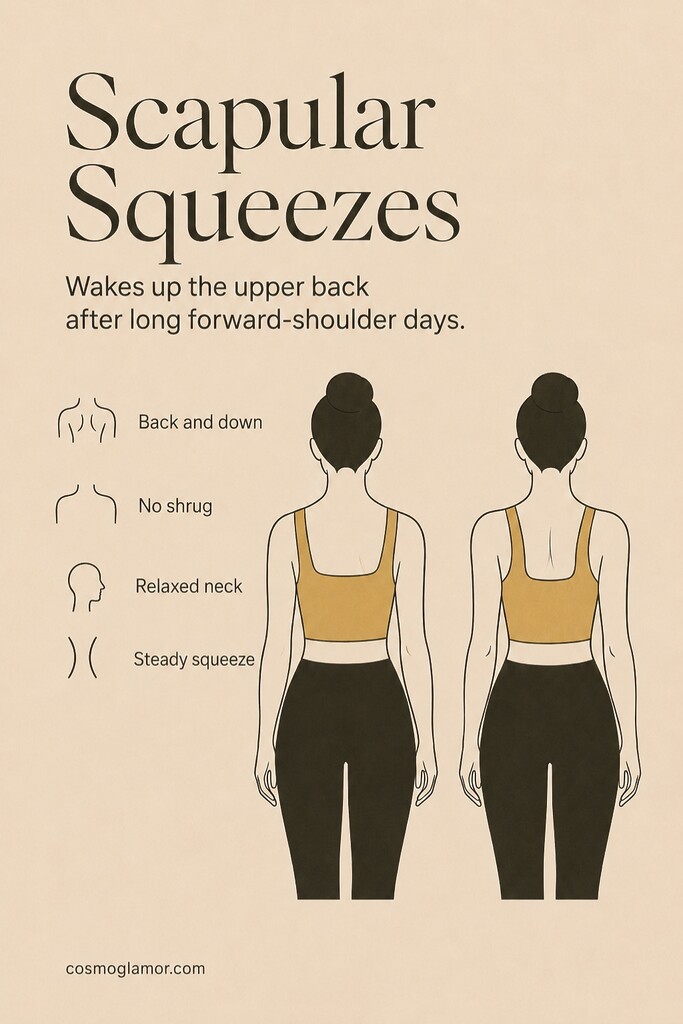
2. Scapular Squeezes
We spend most of our waking hours with our arms out in front of us, which stretches and weakens the upper back. Waking up the rhomboids and trapezius muscles helps them properly anchor your shoulders.
- Sit or stand comfortably with your arms resting at your sides.
- Focus entirely on your shoulder blades, pulling them back and down as if you are trying to hold a pencil between them.
- Hold the squeeze for three seconds before relaxing.
Target: 15 repetitions.
Form check: Make sure to keep your shoulders pulled down away from your ears. Shrugging transfers the work to your upper neck, which defeats the purpose of the movement.
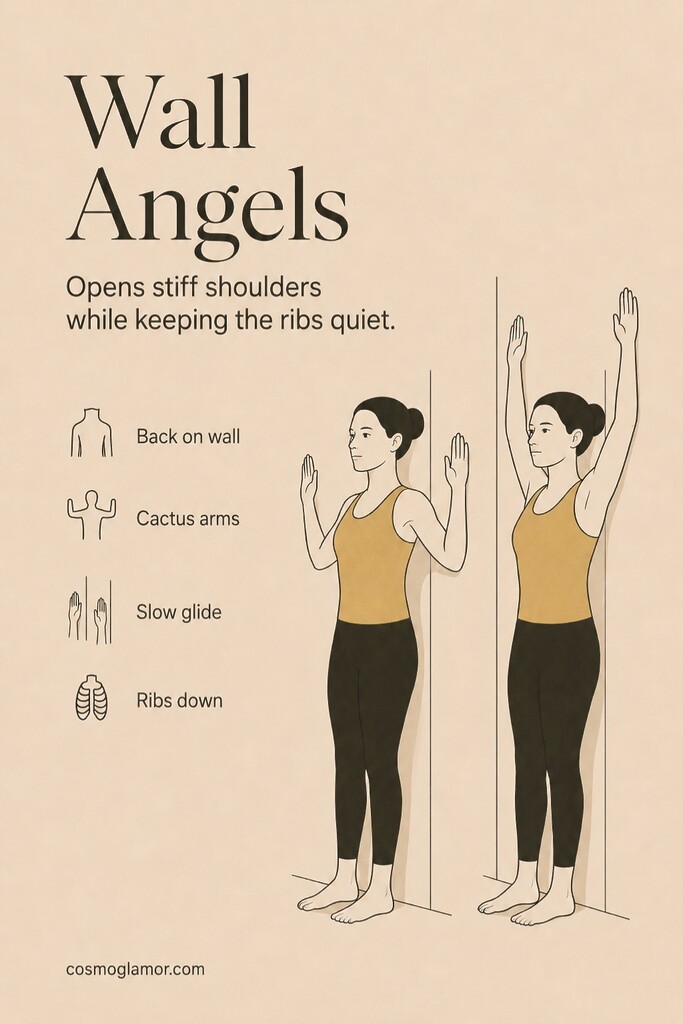
3. Wall Angels
This movement is surprisingly challenging if your chest is tight. Gliding your arms against a solid surface forces your thoracic spine into extension and stops your lower back from arching to cheat the movement.
- Stand with your back flat against a wall, making sure your heels, glutes, upper back, and head are all making contact.
- Raise your arms to a 90-degree angle like a cactus, keeping your elbows and the backs of your hands against the wall.
- Slowly slide your arms up toward the ceiling, then pull them back down.
Target: 10 smooth repetitions.
Form check: Only reach as high as you can while keeping contact with the wall. Do not let your lower back peel off the wall.
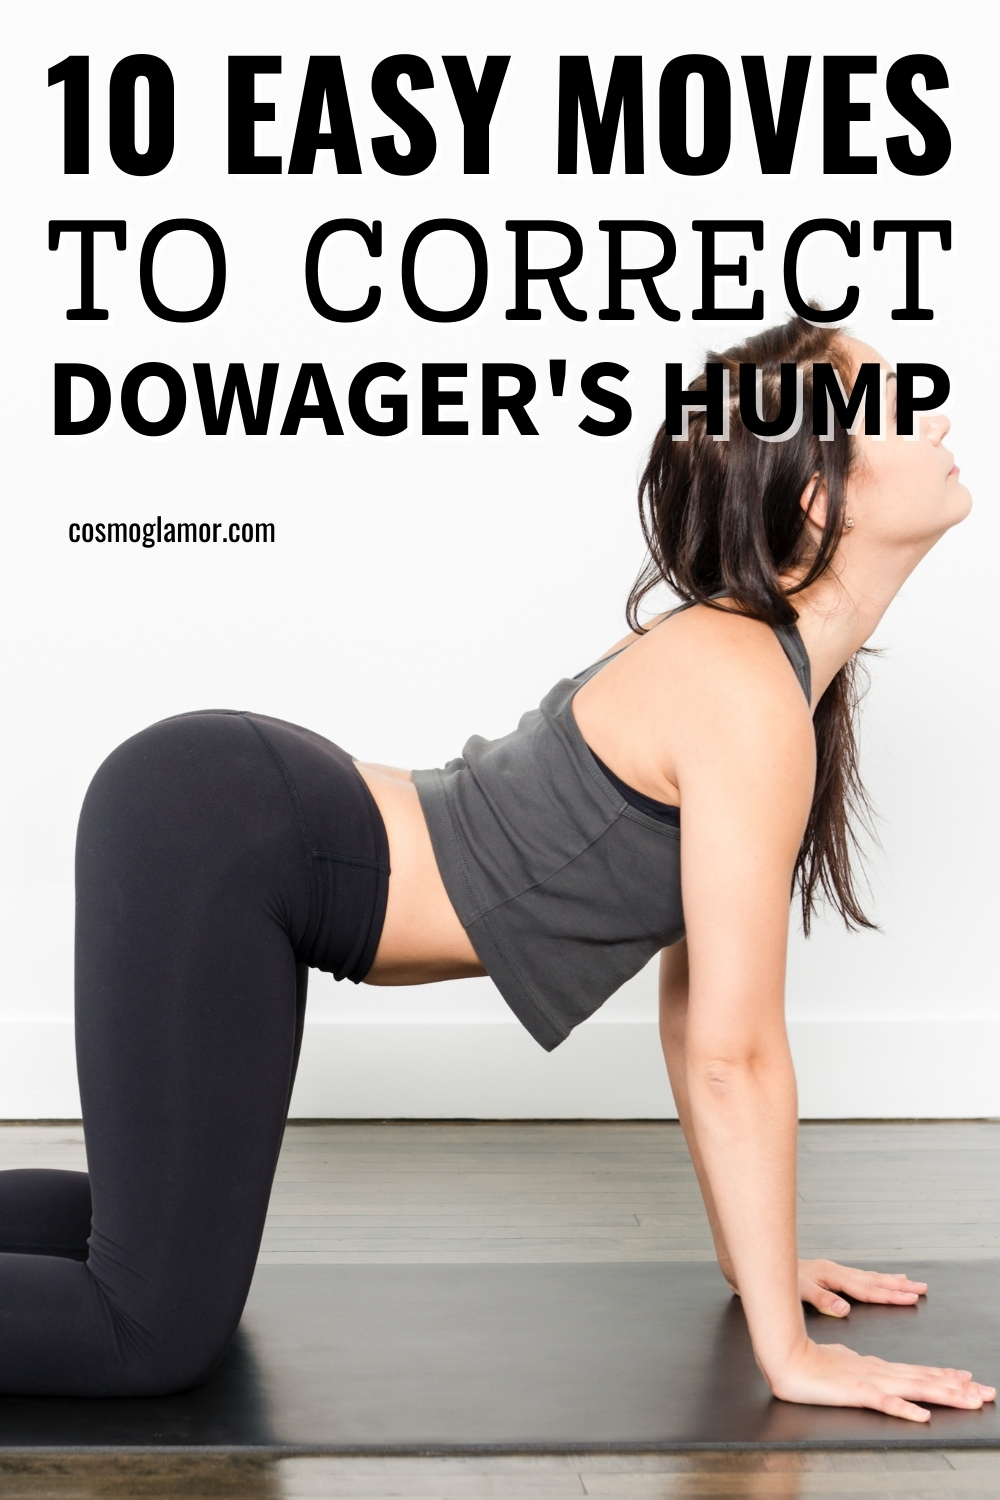
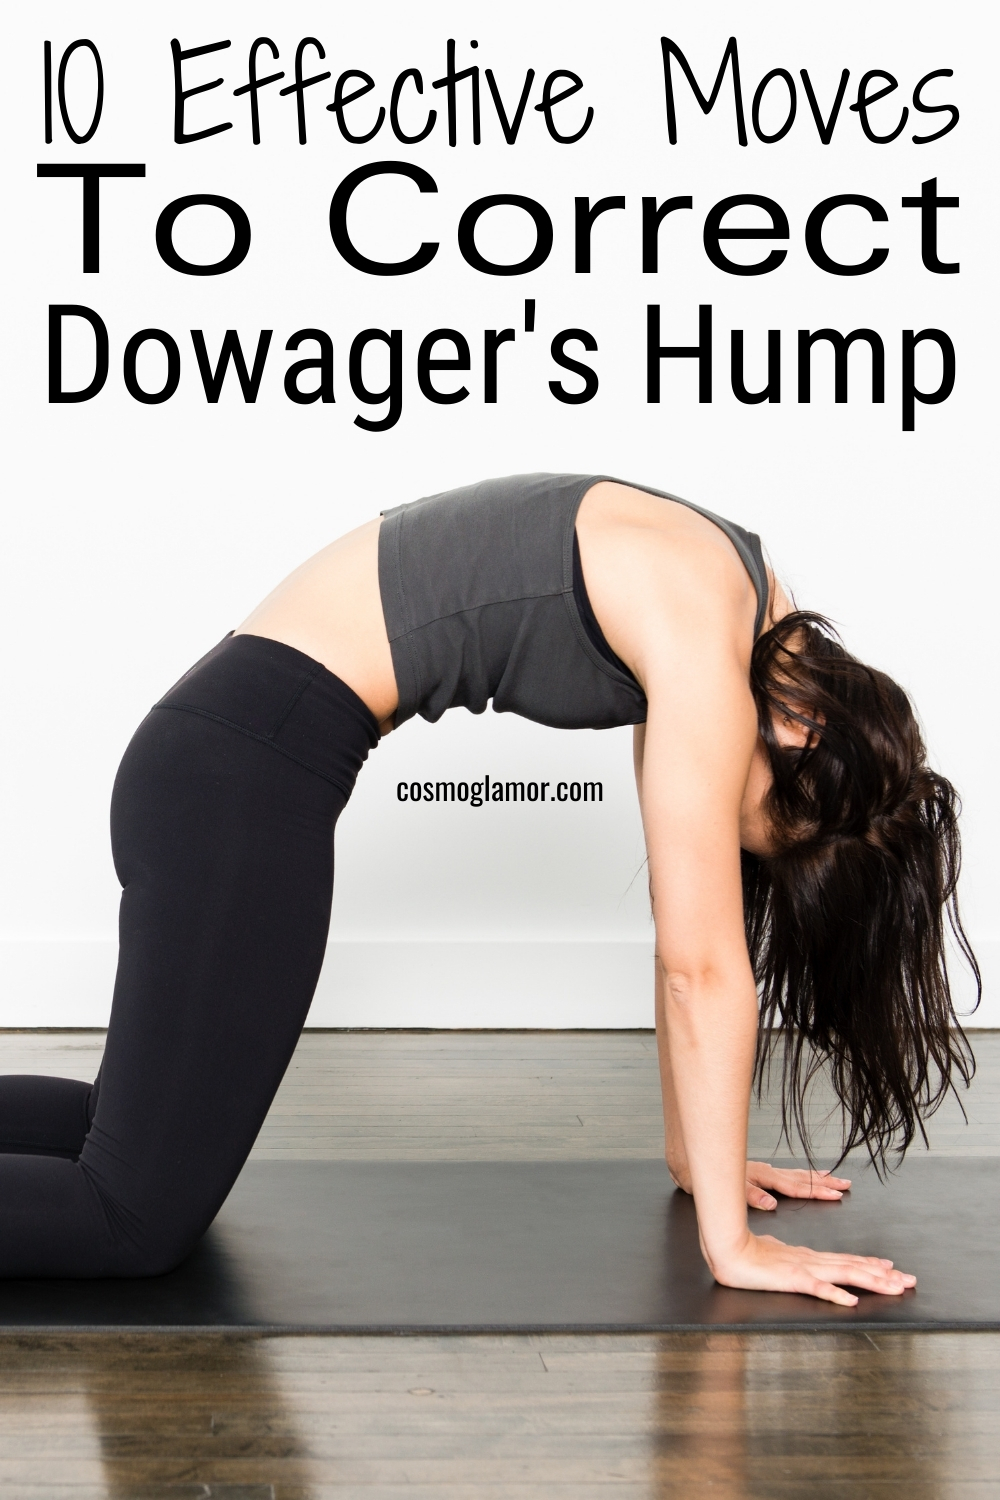
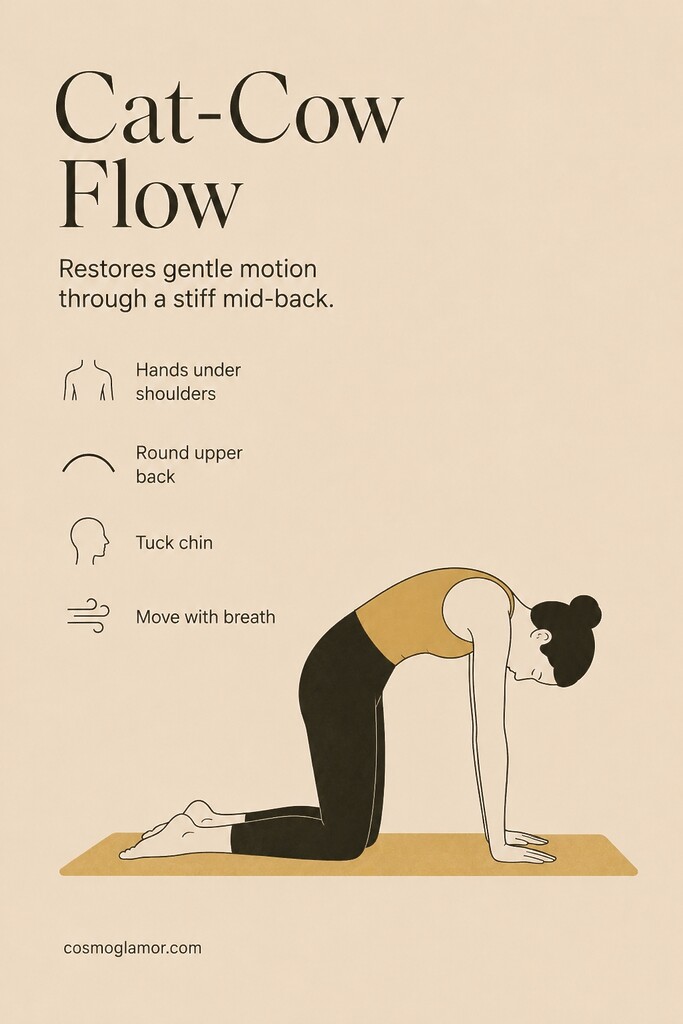
4. The Cat-Cow Mobility Flow
Your spine needs motion to stay lubricated. This flow unlocks stiff thoracic joints by taking them through their full, natural range of motion.
- Get down on your hands and knees with your wrists under your shoulders and your knees under your hips.
- Inhale and let your stomach drop toward the floor while lifting your chest and tailbone.
- Exhale, round your spine up toward the ceiling, and tuck your chin to your chest.
Target: 10 full cycles.
Form check: Focus the rounding motion specifically in your upper back between your shoulder blades, rather than dumping the movement into your lower back.
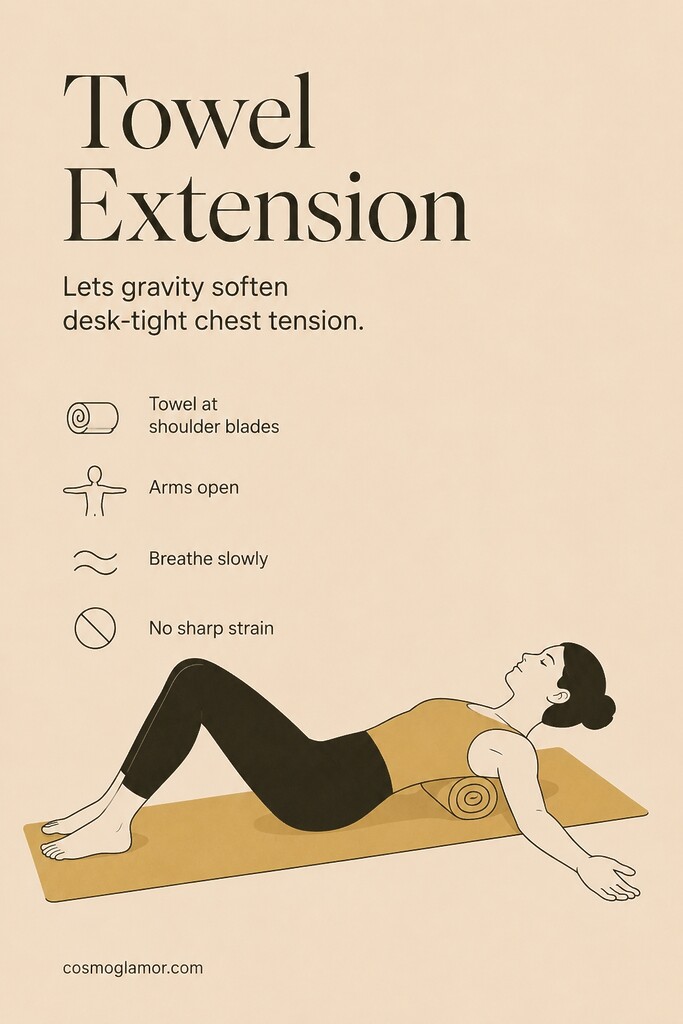
5. Thoracic Towel Extension
For a passive stretch that undoes hours of desk work, this uses gravity to do the heavy lifting. Supporting the natural curve of the mid-back allows the chest muscles to release tension without requiring active effort.
- Roll up a standard bath towel into a tight cylinder. A small hand towel will not provide enough lift.
- Lie on your back on the floor and place the rolled towel horizontally across your spine, right at the level of your shoulder blades.
- Open your arms wide out to the sides and let gravity pull your shoulders toward the floor.
Target: Hold for 3 to 5 minutes.
Form check: Rest your head on a small pillow if your neck feels strained reaching the floor. The stretch should feel relieving, never sharp.
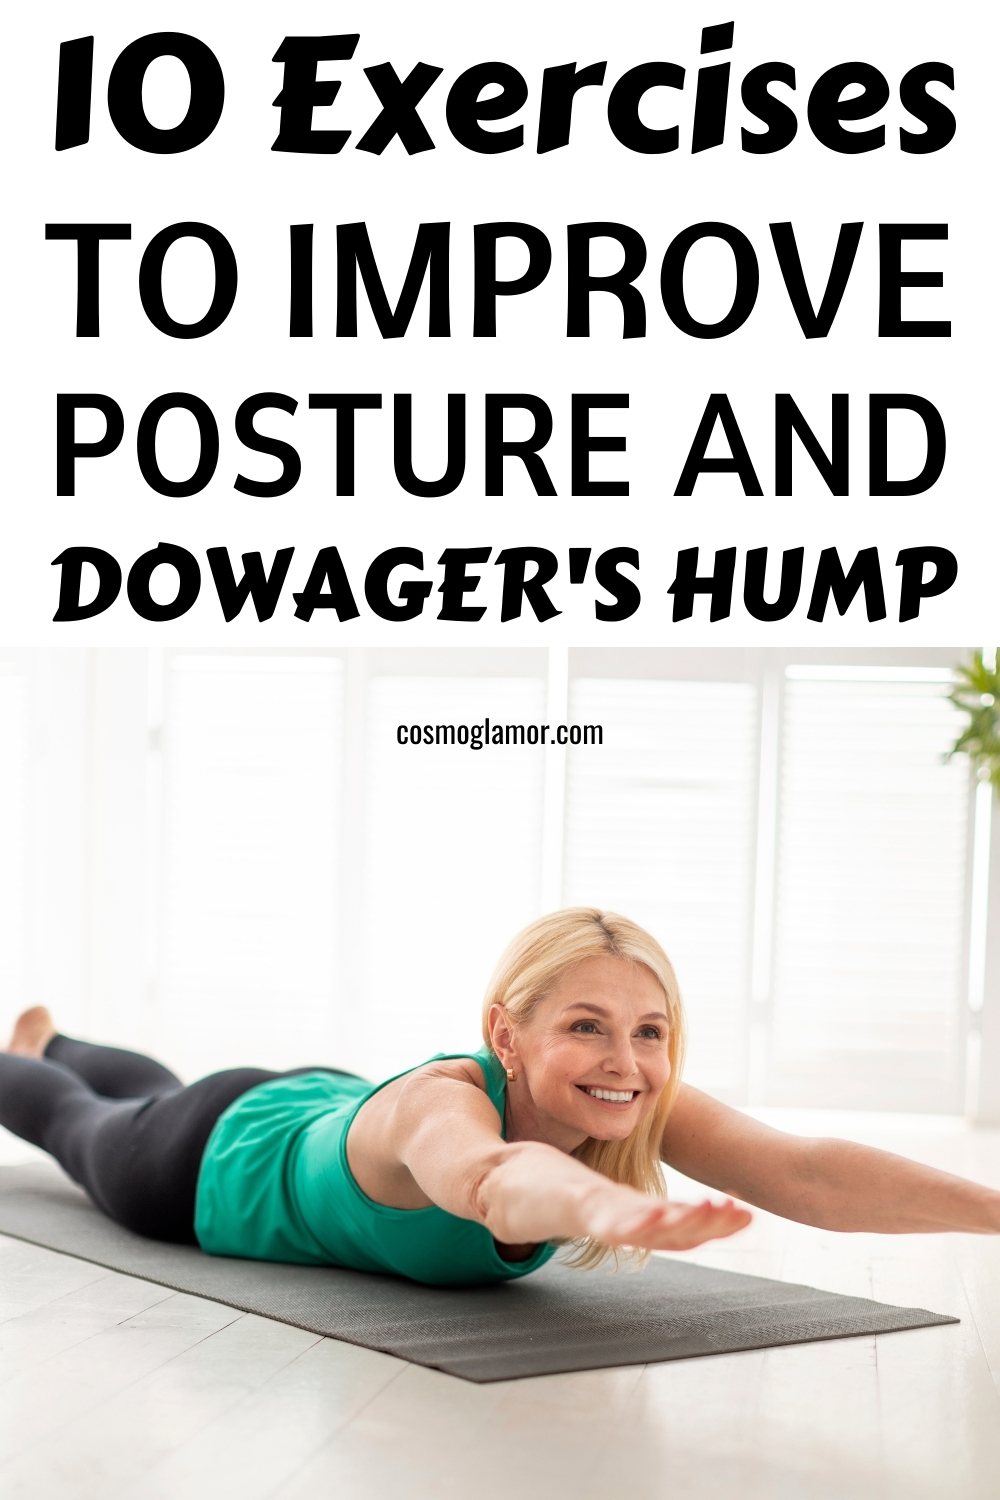
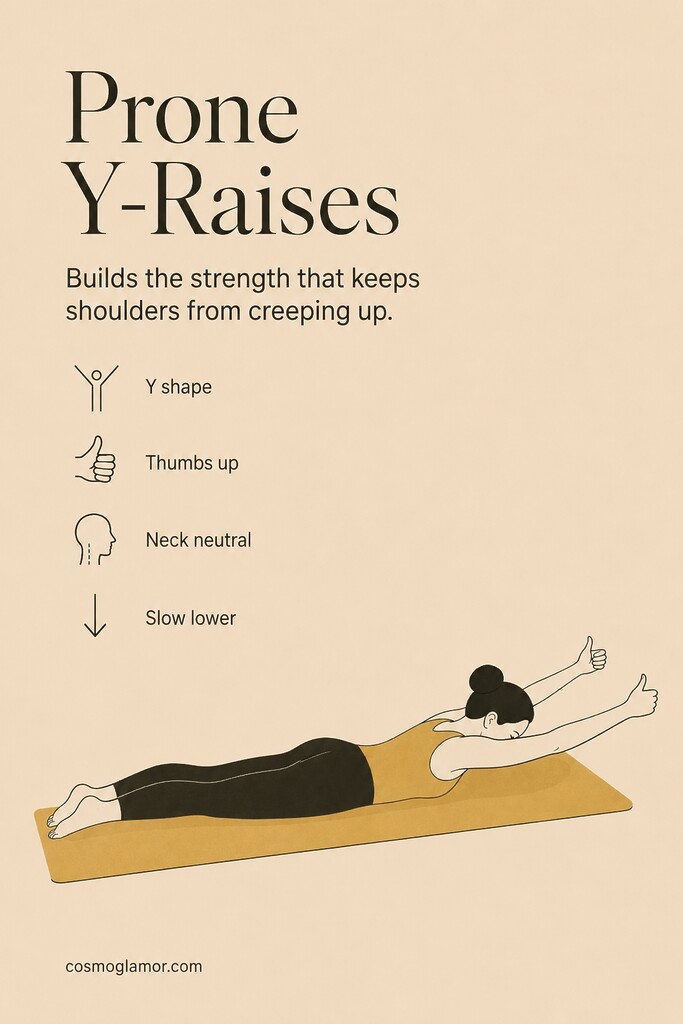
6. Prone Y-Raises
This strengthens the lower trapezius, which is crucial for pulling the shoulders down and away from your ears.
- Lie flat on your stomach with your arms extended up and out at a 45-degree angle, forming a “Y” shape with your body. Point your thumbs toward the ceiling.
- Keeping your head in a neutral position facing the floor, lift your arms straight up toward the ceiling by squeezing your lower shoulder blades.
- Lower your arms slowly.
Target: 10 repetitions.
Form check: Resist the urge to drop your hands quickly on the way down. Keep your neck relaxed rather than craning to look forward.
Posture is not a permanent identity; it is simply a physical record of your most frequent daily habits.
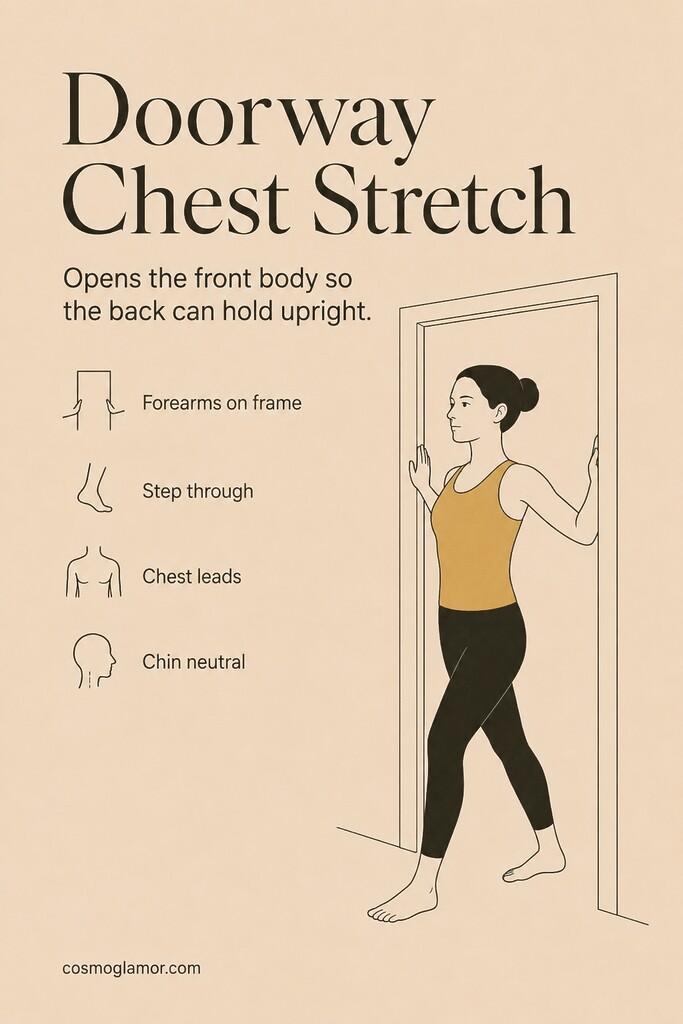
7. Doorway Pectoral Stretch
A hunched upper back is almost always paired with a tight chest. Opening the pectoral muscles removes the forward pull on your shoulders, giving your back muscles a fighting chance to hold you upright.
- Stand in an open doorway and place your forearms on the doorframe, with your elbows bent at 90 degrees.
- Take one step forward through the doorway until you feel a stretch across your chest and the front of your shoulders.
- Hold the stretch, then step back and repeat.
Target: 2 repetitions per side, holding for 30 seconds each.
Form check: Avoid jutting your chin forward as you lean in. Let your chest lead the movement.
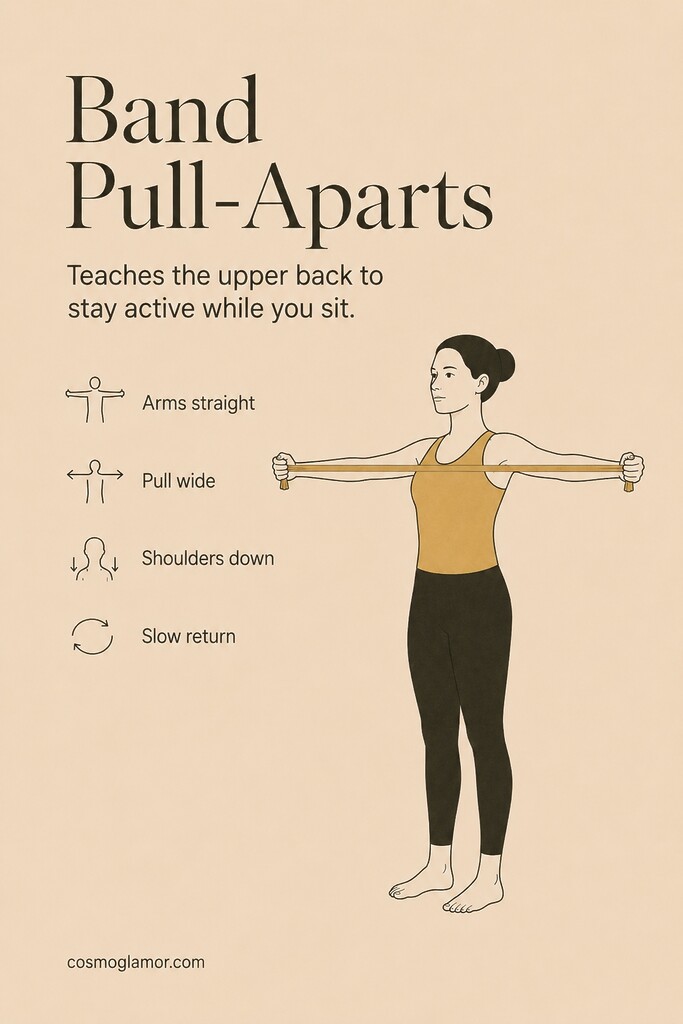
8. Resistance Band Pull-Aparts
The constant tension of the band forces the stabilizer muscles in the upper back to fire continuously, which translates to better sitting posture later.
- Hold a light resistance band in front of you with both hands, arms straight and roughly shoulder-width apart.
- Squeeze your shoulder blades together and pull the band apart until it touches your chest.
- Slowly return to the starting position.
Target: 15 repetitions.
Form check: Control the return so the band does not snap your arms forward. Keep your shoulders down away from your ears the entire time.
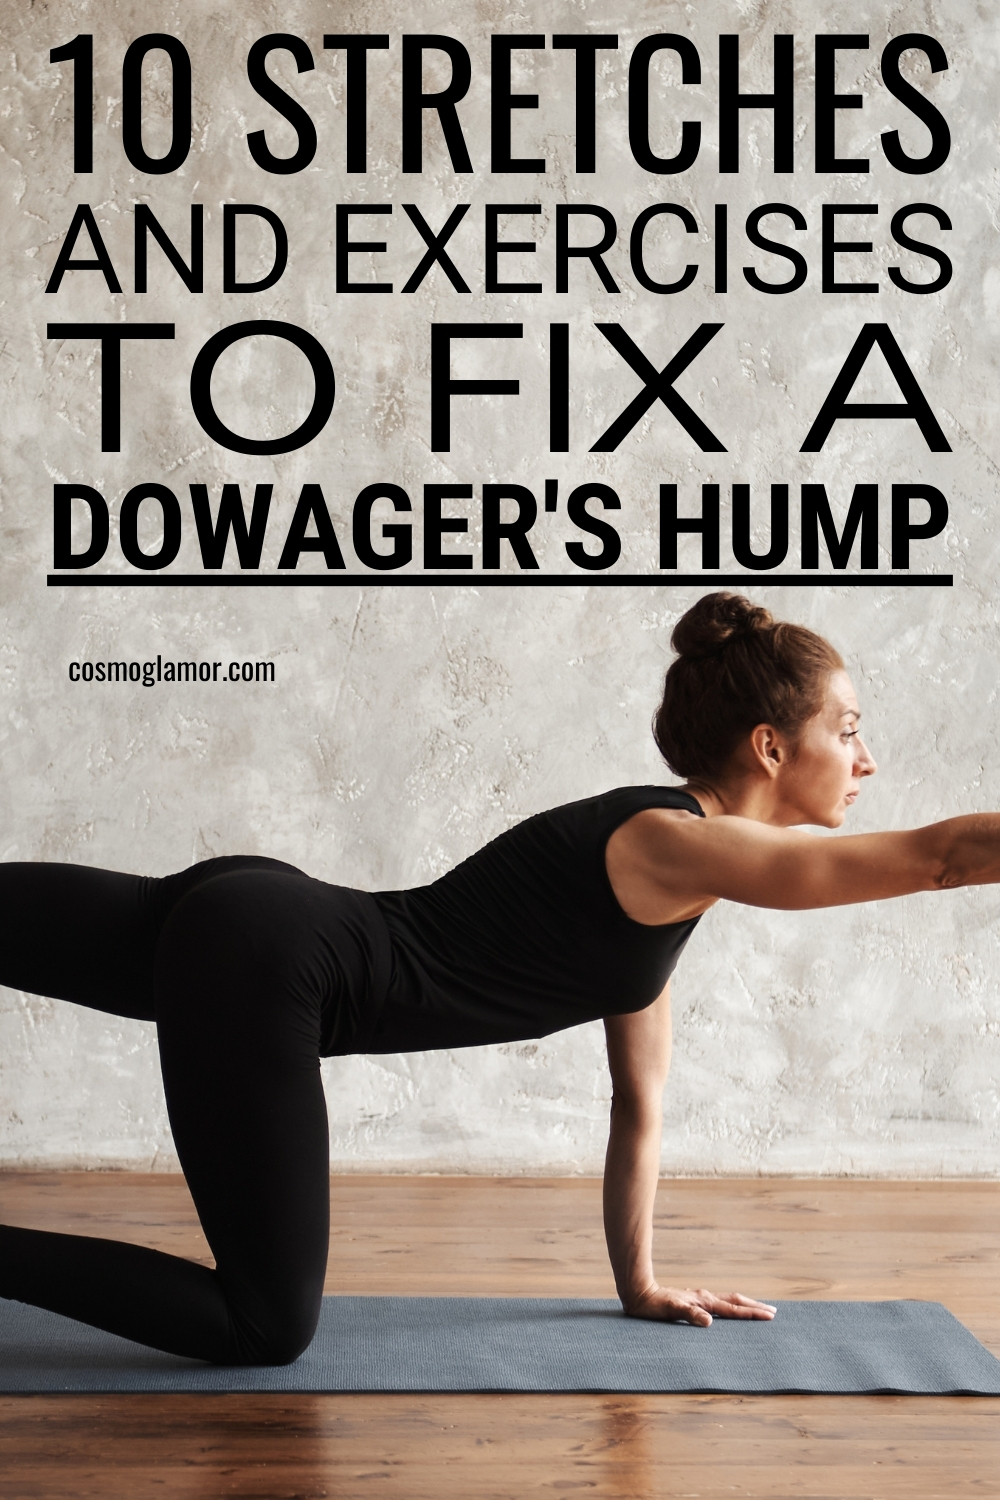
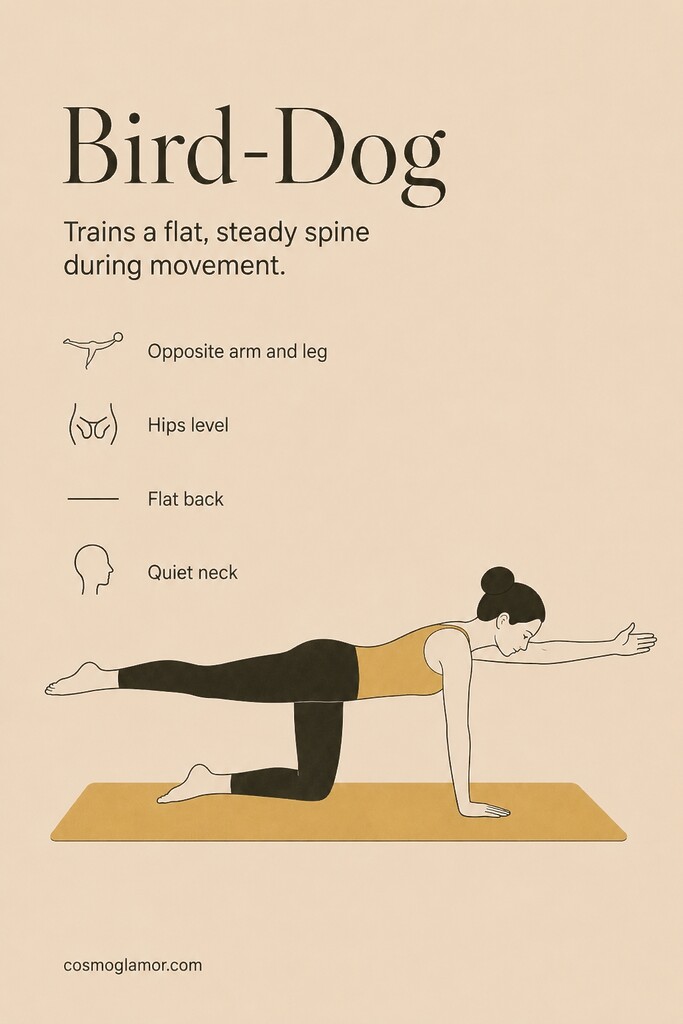
9. The Bird-Dog
Posture requires core stability just as much as back strength. Extending opposite limbs challenges your rotational stability, teaching your spine how to maintain alignment while the rest of your body moves.
- Start on your hands and knees.
- Tighten your core and simultaneously extend your right arm forward and your left leg straight back.
- Hold for two seconds, then lower and switch sides.
Target: 10 repetitions per side.
Form check: Keep your back completely flat. Resist the urge to twist your hips upward when lifting your leg.
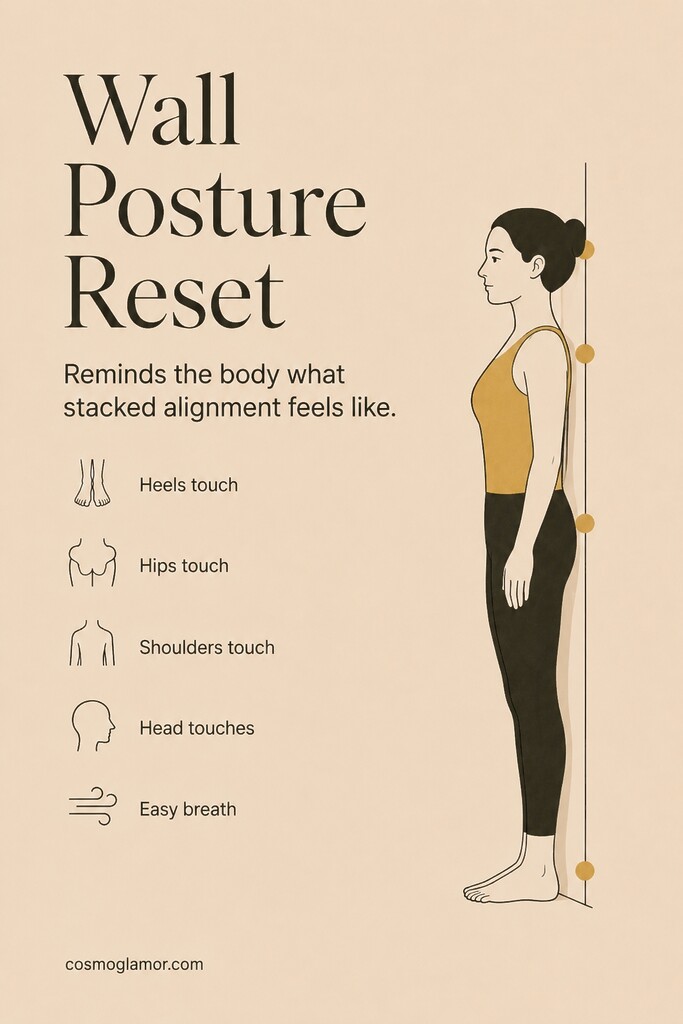
10. The Wall Posture Reset
This is less of a workout and more of an alignment check you can do anywhere. By forcing your body into a perfectly stacked alignment, you give your nervous system a physical template to remember when you step away from the wall.
- Stand with your back against a wall.
- Ensure your heels, buttocks, shoulders, and the back of your head are all touching the drywall.
- Breathe deeply while maintaining this exact position.
Target: Hold for 1 full minute.
Form check: You will likely feel a stretch in the front of your neck and chest. Do not let your ribs flare out as you inhale.
The Other 23 Hours
Ten minutes of daily stretching cannot compete with fourteen hours of sitting in a slumped position. If you want the physical changes to stick, you have to adjust the environment that created the curve in the first place.
First, look at how you sleep. Resting your head on two thick pillows can push your cervical alignment overnight in the direction you are trying to undo. Swap them for a single, supportive pillow that keeps your spine relatively neutral overnight.
During the workday, bring your screen up to your eyes rather than dropping your head to the screen. If you work on a laptop, place it on a stack of books and use an external keyboard to keep your gaze level. Finally, set a quiet alarm to break your desk posture every hour. You do not need to do a full workout; just standing up and reaching overhead resets the tissue tension before it sets in.
Frequently Asked Questions
How long does it take to see improvements?
Changes in posture rely on building muscle endurance and lengthening tight tissue. If you practice a combination of these movements daily, you may notice less neck stiffness before you see visible changes in the curve itself. Visible changes usually take longer and depend on consistency, severity, and whether the curve is flexible.
Is it ever too late to fix a dowager's hump?
For many people, especially when the curve is flexible, the hump is more of a flexible postural issue than a fixed structural change. As long as your spine still has mobility, you can improve the alignment. If your spine feels completely rigid or the hump is accompanied by severe osteoporosis, consult a physical therapist before trying to force the curve flat.
You do not need an hour-long gym session to change how you carry yourself. Pick three of these movements and attach them to a habit you already have, like waiting for your morning coffee to brew. Consistency quietly rewires how your body holds itself up.
Sources
- Association Between Forward Head, Rounded Shoulders, and Increased Thoracic Kyphosis – Journal of Chiropractic Medicine, 2017.
- Deep Neck Flexor Strengthening and Forward Head Posture – Annals of Clinical and Analytical Medicine, 2021.
- Ergonomic Consideration in Pillow Height Determinants and Evaluation – Healthcare, 2021.
- Screen Height and Keyboard Placement During Laptop Work – International Journal of Human-Computer Interaction, 2021.
- Dowager’s Hump: What It Is and How To Get Rid of It – Cleveland Clinic, 2023.
- Therapeutic Exercises for Forward Head Posture, Rounded Shoulder, and Hyperkyphosis – BMC Musculoskeletal Disorders, 2024.
- Save for Later363.9K


6 Responses
Thank you. I hope to do these things
That’s wonderful to hear! I’m so glad you found the article helpful. Taking that first step of wanting to do them is a fantastic start. You’ve got this, and I’m rooting for you on your journey to a healthier posture! Let me know if any questions come up as you get started.
Thank you for this article! While I eat well, and I’m in pretty good shape, my posture changed after a car accident where I experienced whiplash and was in a fair amount of pain for about 2.5 years. Thanks to people like you sharing info online, I used targeted strength training to fix the issues causing me pain, but my posture is still off, so I’m trying to correct it. I already do some of these exercises as part of my regimen from my accident, but I’m hoping that adding the others makes a difference for me. Between the accident and peri-menopause, I feel like my body is fighting against me, but I’m determined to figure it out. Thank you for sharing.
Thank you so much for sharing your story. Overcoming 2.5 years of pain after an accident like that shows incredible strength and resilience. It’s amazing that you’ve been so proactive in your own recovery.
That feeling of your body fighting against you, especially when you’re navigating perimenopause on top of everything else, is so real and can be incredibly frustrating. Your determination to figure it out is truly inspiring. I’m very hopeful that adding these new movements will give your body the gentle signals it needs to find its alignment again. Wishing you the very best on your journey.
Thank you for these! I’ll start these too!
I have kyphosis and Lordosis since 5th grade, wore 23 hour back brace for 3 years. It helped but I still have it.
I feel so much tension in my upper back. I’m excited to feel some relief from these.
Wow, thank you so much for sharing your journey with this. Dealing with kyphosis since childhood and wearing a brace for that long sounds incredibly challenging. That constant tension in the upper back can be so draining, and I’m really hopeful that these gentle movements can help bring you some of the relief you’re looking for. Just remember to start slow and listen to your body. Wishing you all the best!